
Path of Exile 2 Kalguuran Gem Guide (poe 2 runic ward gem)
Path of Exile 2's 0.5 Return of the Ancients expansion drops on May 29, 2026 — and among everything GGG is throwing at us, the new Kalguuran skill gems are the


Kalguuran Gem Showcase: Repulsion & Bitter Dead
Path of Exile 2's 0.5 Return of the Ancients expansion drops on May 29, 2026 — and among everything GGG is throwing at us, the new Kalguuran skill gems are the change that quietly reshapes how builds are constructed from the ground up. Two of the most interesting early examples: Repulsion and Bitter Dead.
Before getting into what these gems actually do, the single most important thing to understand is what they don't require. No mana cost. No life cost. No attribute requirements. Zero. A pure Strength Warrior can slot Bitter Dead — a Cold AoE spell — without touching a single node on the tree. That's not a small thing. That's the entire build-diversity pitch of this expansion in two gems.
How Kalguuran Gems Are Fueled
Both gems cost Runic Ward — the new defensive resource introduced in 0.5, forged from the ancient metal Verisium. Ward acts as a secondary life pool that prevents death when your HP hits zero, but it also doubles as the fuel source for every Kalguuran skill. Spend it to cast, or hold it to survive. That tension is the core loop.
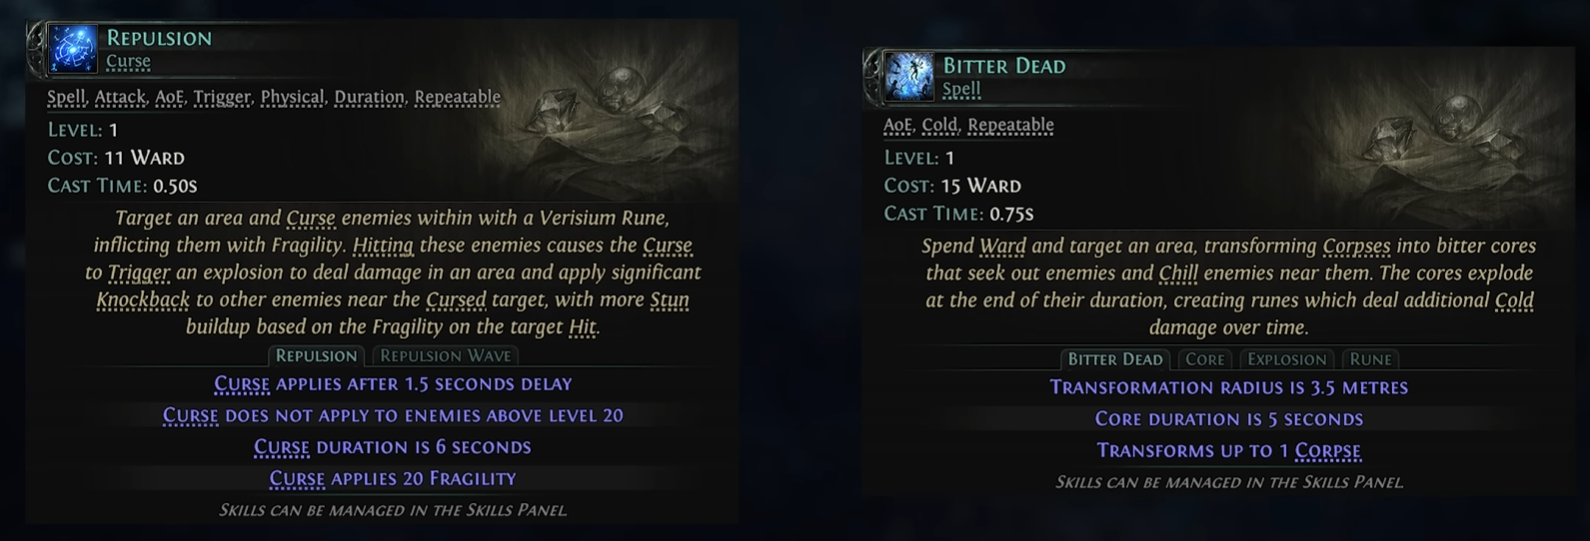
Repulsion costs 11 Ward at Level 1. Bitter Dead costs 15 Ward. Neither touches your mana pool at all.
Repulsion — Curse, Fragility, and Knockback Chains
Repulsion is tagged as Spell, Attack, AoE, Trigger, Physical, Duration, and Repeatable. Cast time is 0.50 seconds. It targets an area and applies a Verisium Rune Curse to enemies within, inflicting Fragility. Here's where it gets interesting: hitting a Cursed enemy triggers an explosion that deals area damage and applies significant Knockback to nearby enemies. Stun buildup scales with the Fragility on the target at the time of the hit.
The baseline stats at Level 1 tell the full story:
- Curse applies after a 1.5 second delay
- Curse does not apply to enemies above level 20
- Curse duration is 6 seconds
- Curse applies 20 Fragility
That level cap on the Curse is worth flagging. At Level 1 this gem is clearly designed for early-game crowd control — don't expect it to Curse map bosses out of the box. But as a setup tool that chains into Knockback explosions and Stun buildup? Even at base values, the combo potential is obvious.
Bitter Dead — Corpse Conversion and Cold Over Time
Bitter Dead is a Cold AoE Spell with the Repeatable tag. Cast time is 0.75 seconds — slightly slower than Repulsion. The mechanic is genuinely unique: target an area to transform Corpses into bitter cores that seek out enemies, Chill anything near them, then explode at the end of their duration to create runes that deal Cold damage over time.
Level 1 stats:
- Transformation radius: 3.5 metres
- Core duration: 5 seconds
- Transforms up to 1 Corpse
One corpse at a time, base level. The ceiling clearly scales — but even at one, the sequence of Chill application into Cold DoT rune placement is a multi-phase damage pattern that rewards positional play. Drop this after a kill, let the core chase stragglers, watch the rune field do work.
Gear That Speaks the Kalguuran Language
Patch 0.5 didn't just drop Kalguuran Gems into the game and call it a day. It introduced gear built specifically around the Runic Ward system — armour and runes that treat Ward not as a secondary stat but as the entire defensive identity of a build. The Runeforged Chieftain Cuirass is the clearest example of this design philosophy made physical.
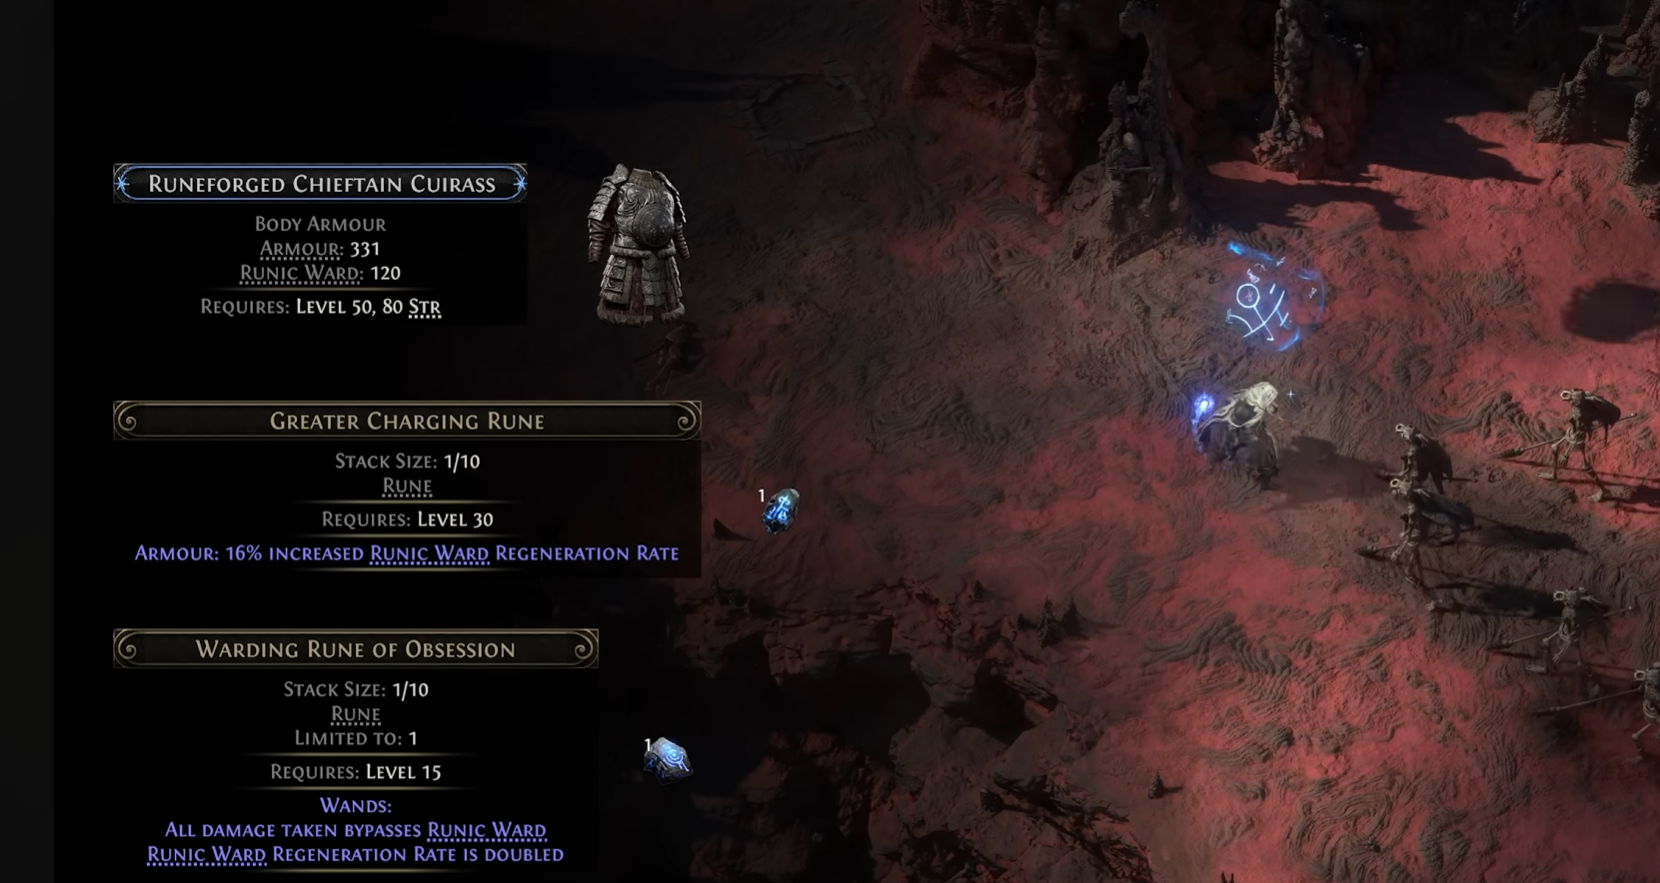
This is a Level 50, 80 Strength Body Armour. It carries 331 Armour and — more importantly — 120 Runic Ward. That Ward value isn't a bonus. It's the point.
Why 120 Runic Ward on a Chest Piece Matters
Kalguuran Gems like Repulsion and Bitter Dead are fueled by Runic Ward. The Ward pool is what gets consumed when these skills activate, and it regenerates over time. So every point of base Ward on your gear is directly translating into how often your gems can fire — and how much punishment you can absorb between casts. Higher Ward ceiling means more uptime. Simple as that.
120 Ward from a single chest slot is substantial. Stack that with Ward from other slots and you're building a meaningful resource pool, not just a thin buffer that evaporates the moment anything looks at you.
The Rune System — Two Very Different Tools
The screenshot shows two runes, and they pull in completely opposite directions. Understanding both is essential before you slot anything.
| Rune | Level Req. | Effect | Restriction |
|---|---|---|---|
| Greater Charging Rune | Level 30 | 16% increased Runic Ward Regeneration Rate | — |
| Warding Rune of Obsession | Level 15 | All damage taken bypasses Runic Ward; Runic Ward Regeneration Rate is doubled | Wands only. Limited to 1. |
The Greater Charging Rune is the safe, additive choice. Slot it into armour, accelerate your Ward regeneration, keep your Kalguuran Gems fed. Straightforward. Nothing flashy. But 16% faster regeneration compounds well when you're stacking multiple pieces with Ward bases — your gems stay active, your defensive layer stays up.
The Warding Rune of Obsession is a completely different animal.
All damage taken bypasses Runic Ward. Let that sink in. Your Ward no longer blocks hits — it becomes a pure regeneration engine with zero defensive function. In exchange, the regeneration rate doubles. This is an aggressive, high-commitment socket choice designed for one thing: maximising how fast your Kalguuran Gems can cycle, at the cost of every point of damage mitigation Ward would normally provide.
The "Limited to 1" restriction on Warding Rune of Obsession is doing a lot of work there. GGG clearly didn't want this stacking — doubled regen is already a significant multiplier on gem uptime, and two of these would essentially turn Ward into a pure cooldown stat with zero survivability contribution.
Matching Runes to Your Gem Strategy
So which do you run? Depends entirely on how you're using your Kalguuran Gems.
- If your build relies on Ward as actual defence — absorbing hits, staying alive through sustained encounters — the Greater Charging Rune is your friend. It feeds the regeneration loop without gutting your survivability.
- If you're running a setup where Ward mitigation is irrelevant — high evasion, block, or simply glass-cannon mapping — the Warding Rune of Obsession turns your Ward pool into a pure gem-fueling mechanism. The doubled regeneration rate means Repulsion and Bitter Dead get access to their Ward cost far more frequently.
The Runeforged Chieftain Cuirass with its 120 base Ward is the ideal platform for either approach. It gives you enough Ward to make the Obsession rune's trade-off feel meaningful rather than suicidal — you're doubling a real number, not doubling a pittance.
Gear built around Kalguuran Gems isn't just stat sticks. It's infrastructure. And the rune system is how you tune that infrastructure to match exactly what your gems need.
Bitter Dead — What It Actually Does
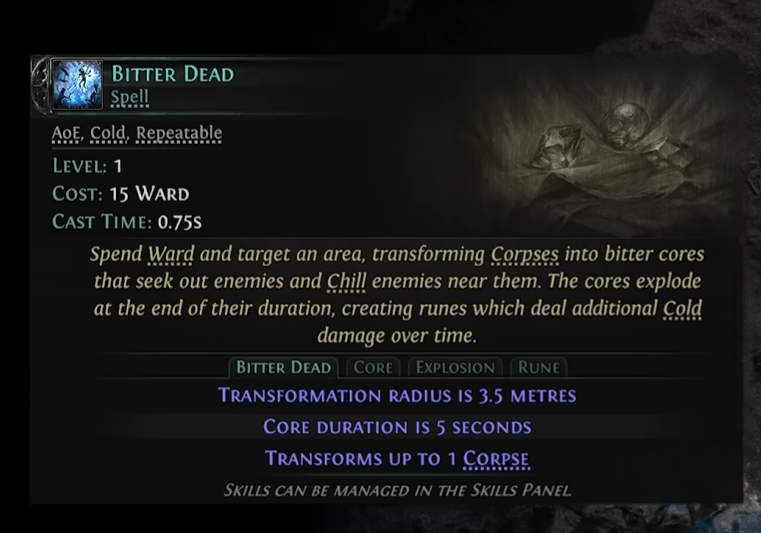
Bitter Dead is a Level 1 Spell with the AoE, Cold, and Repeatable tags. It costs 15 Ward to cast and has a 0.75-second cast time. That Ward cost is the whole point — this is a Kalguuran Gem, meaning it pulls from your Ward resource rather than Mana or Life.
The mechanic is straightforward. Target an area containing Corpses. Bitter Dead converts those Corpses into bitter cores — mobile projectiles that seek out nearby enemies and apply Chill. After 5 seconds, the cores detonate, leaving behind Runes that deal Cold damage over time.
Three numbers define the base behaviour at Level 1:
- Transformation radius: 3.5 metres
- Core duration: 5 seconds
- Corpses transformed: up to 1 per cast
That last stat is the critical one at Level 1. One Corpse per cast. So the damage output is entirely gated on how reliably your build generates Corpses — and how often you can spend 15 Ward to trigger the conversion.
The damage pipeline here is two-stage. First, the seeking core Chills enemies — slowing them, setting up your other Cold abilities. Then the explosion leaves a Rune on the ground. Cold damage over time, persistent, area-denial. It's not a burst spell. It's a setup tool that rewards patient, layered play.
Worth noting: the Repeatable tag means you can keep casting this as long as you have Ward and Corpses available. It's not a one-and-done cooldown skill. Manage your Ward generation well and Bitter Dead becomes a consistent part of your rotation rather than an occasional nuke.
The Four Skill Tags
The tooltip breaks Bitter Dead into four component tags: Bitter Dead, Core, Explosion, and Rune. Each tag is a separate interaction point. Modifiers that affect Explosions will amplify the detonation. Modifiers that affect Runes will extend or enhance the Cold DoT field left behind. These aren't cosmetic labels — they're the hooks that gear and passive nodes will interact with.
If you're building around this skill, you need to think about all four phases, not just the flashy explosion in the middle.
Detonate Living — Detonating the Living This Time
Detonate Dead has been a Path of Exile staple for years — blow up a corpse, wreck everything nearby, repeat forever. Classic. Detonate Living takes that same satisfying concept and asks: why wait for them to die first?
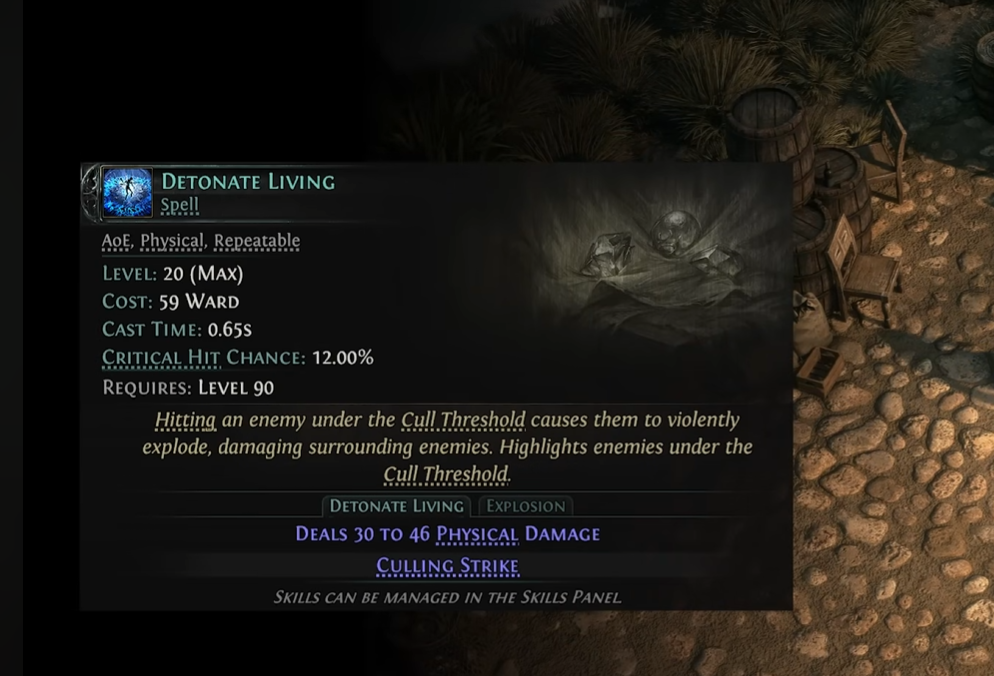
This is a Level 20 (Max) Kalguuran Spell tagged as AoE, Physical, and Repeatable. It costs 59 Ward to cast, fires in 0.65 seconds, and carries a 12.00% Critical Hit Chance. Requires Level 90 to equip — so this is firmly endgame territory.
The mechanic is elegantly brutal. Hitting an enemy under the Cull Threshold causes them to violently explode, damaging surrounding enemies. The skill also highlights enemies currently under the Cull Threshold, so you always know exactly who's about to become a weapon. At max level it deals 30 to 46 Physical damage on the explosion itself — and it has built-in Culling Strike baked right into the gem.
That last part matters more than it sounds. Culling Strike here isn't a support gem slot you're burning. It's free. The skill just kills anything under the threshold and turns the corpse into a bomb. In one action.
Compared to Detonate Dead — which demands you first create a corpse, then detonate it — Detonate Living collapses two steps into one. No corpse required. No setup. Just find a wounded enemy and press the button. The Ward cost keeps it honest, of course. At 59 Ward per cast you need a healthy Runic Ward pool to spam this freely, which means it rewards the same investment the rest of the Kalguuran kit is already asking for.
Where Detonate Dead shines in dedicated corpse-explosion builds with stacked fire conversion and explosion radius scaling, Detonate Living slots more naturally into aggressive Physical AoE setups that want to finish packs fast and chain explosions off low-health stragglers. Different fantasy. Both deeply satisfying.
Quick Stats at a Glance
| Stat | Value |
|---|---|
| Gem Type | Spell — AoE, Physical, Repeatable |
| Level | 20 (Max) |
| Cost | 59 Ward |
| Cast Time | 0.65s |
| Critical Hit Chance | 12.00% |
| Requires | Level 90 |
| Damage | 30 to 46 Physical |
| Built-in Keyword | Culling Strike |
The built-in Cull Threshold highlight is a small quality-of-life touch that ends up being genuinely useful in dense packs — you're never guessing who's low enough. The game just tells you. Then you blow them up.
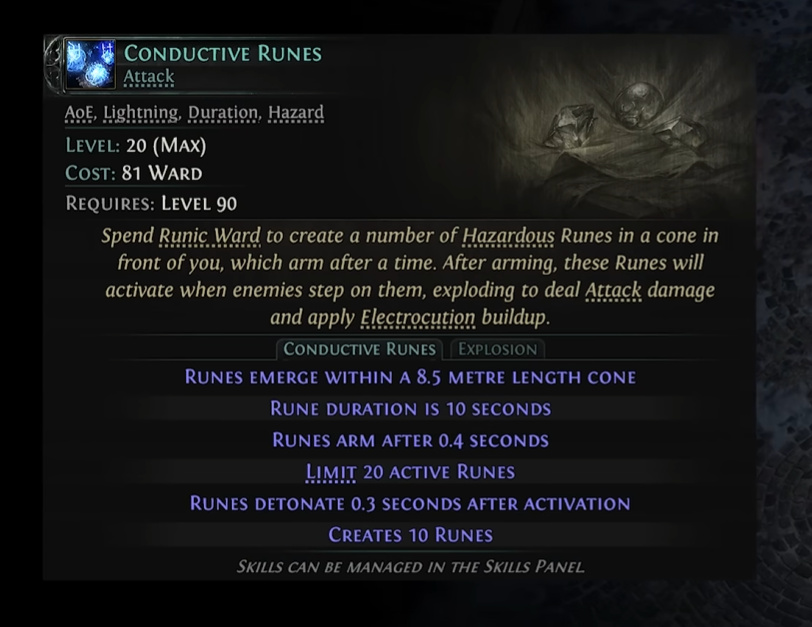
Conductive Runes — Lightning Hazard on Demand
Conductive Runes is a Kalguuran Attack skill tagged AoE, Lightning, Duration, and Hazard. At Level 20 (Max), it costs 81 Ward and requires character Level 90 — so this is firmly an endgame tool, not something you're picking up mid-campaign.
The mechanic is straightforward: spend Runic Ward to scatter Hazardous Runes in a cone in front of you. Those runes arm after 0.4 seconds, then sit and wait. Any enemy unlucky enough to step on one triggers an explosion that deals Attack damage and applies Electrocution buildup. Classic pressure-plate logic, just with lightning.
The Numbers at a Glance
| Stat | Value |
|---|---|
| Cone Length | 8.5 metres |
| Rune Duration | 10 seconds |
| Arm Time | 0.4 seconds |
| Detonation Delay | 0.3 seconds after activation |
| Runes per Cast | 10 |
| Active Rune Limit | 20 |
Two casts and you're at the 20-rune cap. That 8.5-metre cone is generous — wide enough to blanket a chokepoint entirely.
This Is Basically a Trap Build
If you've ever played a Trapper in Path of Exile 1, Conductive Runes will feel immediately familiar — and that's not a coincidence. The DNA is identical. You place hazards, enemies walk into them, explosions happen. You're not the one dealing the damage directly; the floor is.
The arm delay of 0.4 seconds means you can't just drop runes on top of an enemy and expect instant results. You need to pre-place. Funnel enemies through narrow corridors, drop the cone before a pack rounds a corner, or lay runes across a boss arena before the fight starts. Positioning is everything here.
The 0.3-second detonation delay after activation is also worth internalising — runes don't pop the instant they're stepped on. There's a brief window. Against fast-moving bosses, that gap can mean a rune activates but the explosion misses. Against dense packs of slow mobs? Pure carnage.
Why the Kalguuran Identity Matters Here
Like all Kalguuran skills, Conductive Runes costs only Runic Ward — no mana, no energy shield. No attribute or weapon requirements either. That means any class can slot this and immediately start playing a trap-adjacent playstyle without investing into Dexterity or specific weapon types.
The Electrocution buildup on each explosion is the real endgame hook. Stack enough runes across a tight corridor and a single pack can trigger multiple stacks in rapid succession. Against bosses with predictable movement patterns, you can pre-seed the arena and let the Ward cost do the heavy lifting while you focus on positioning.
A Ward-focused build running Conductive Runes essentially becomes a zone-denial machine. Drop your cone, kite enemies through it, repeat. Simple in concept. Surprisingly deep in execution.
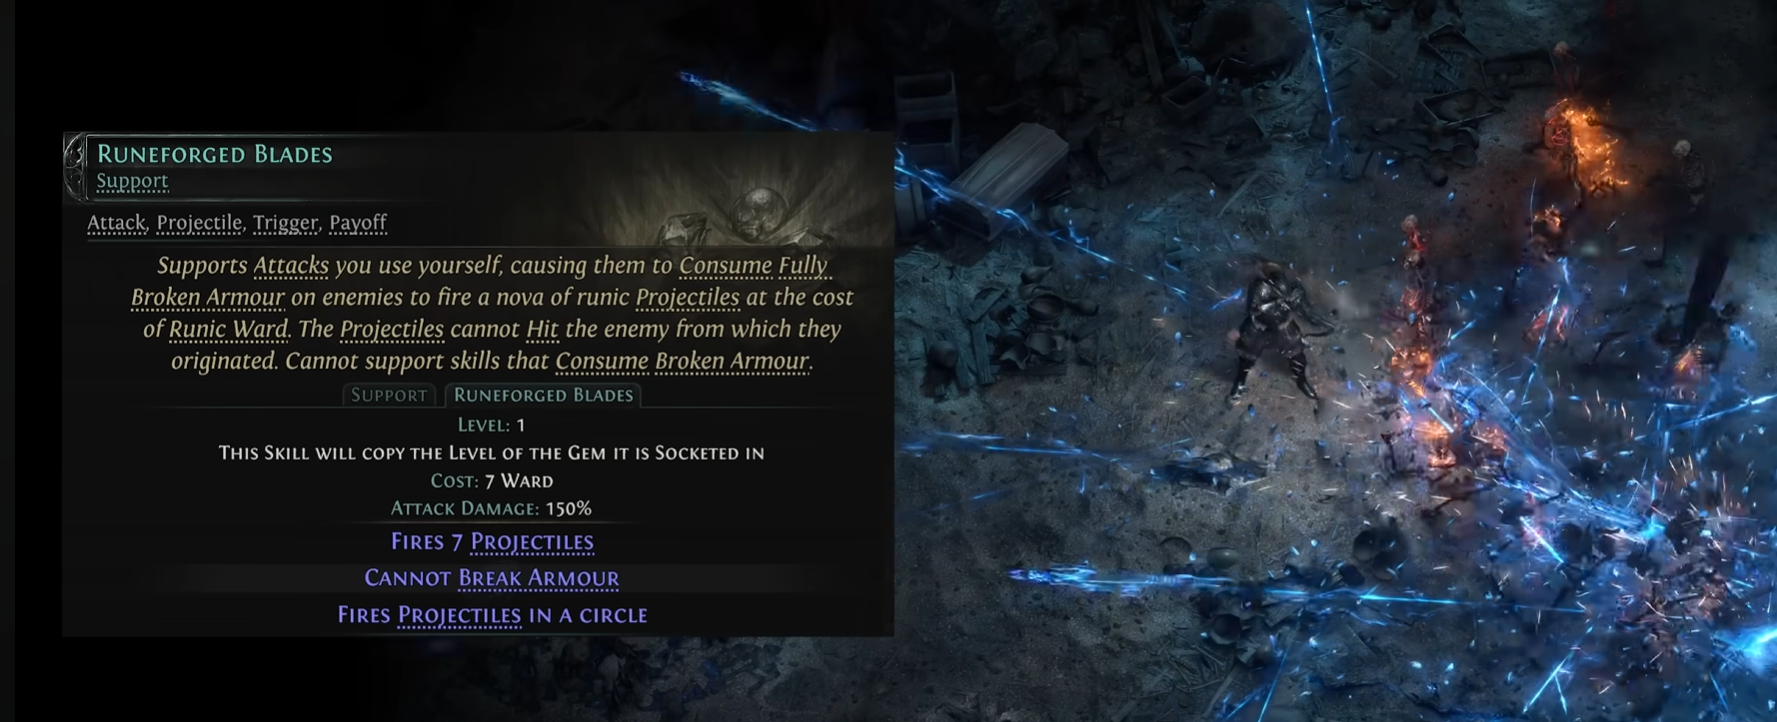
Runeforged Blades — The Payoff Nova
This one has a very specific job. Runeforged Blades is a Support gem tagged as Attack, Projectile, Trigger, and Payoff — and that last tag tells you everything. It doesn't fire on every hit. It fires when you earn it.
The mechanic: when you attack an enemy whose Armour is Fully Broken, the supported skill Consumes that Fully Broken Armour and detonates a nova of runic Projectiles outward from that enemy. The cost is 7 Runic Ward. The projectiles deal 150% Attack Damage and fire in a circle — 7 of them, spreading in all directions. One catch: those projectiles cannot hit the enemy they originated from. You're not double-dipping the source target. You're clearing everything around it.
Two hard rules to know upfront:
- Cannot support skills that Consume Broken Armour — only Fully Broken triggers this
- Cannot Break Armour itself — this gem is purely a payoff, not a setup tool
The gem also copies the Level of whatever gem it's socketed in. So your ceiling scales with your primary skill, not a separate gem grind.
The Ranged Build That's Already Writing Itself
Seven projectiles firing in a full circle at 150% Attack Damage. That's not a cleanup tool — that's a screen-clear waiting for the right supports.
Chain and Pierce are the obvious candidates here, and the community has already caught on. Pierce lets each projectile punch through multiple enemies before stopping. Chain bounces projectiles to additional targets after the first hit. Stack both, and those 7 nova projectiles stop being 7 hits — they become a cascading web that reaches enemies you never even aimed at.
The interaction to understand: Pierce takes priority over Chain on a per-projectile basis. A projectile will pierce first, and only Chain once it can no longer pierce. So if you're building around both, you want enough pierce to carry through dense packs, with Chain picking up strays on the edges. Pure Chain without Pierce also works cleanly — arguably simpler to manage.
Either way, the fantasy is real. Break Armour with your primary attack, detonate the nova, let Pierce and Chain do the rest. A dedicated bow or wand build with solid Armour-breaking uptime could turn every Fully Broken enemy into a 360-degree projectile explosion. In a league built around Runic Ward as a resource, that 7 Ward cost is essentially free if your Ward generation is healthy.
Quick Stats
| Stat | Value |
|---|---|
| Gem Type | Support |
| Tags | Attack, Projectile, Trigger, Payoff |
| Cost | 7 Ward |
| Attack Damage | 150% |
| Projectiles Fired | 7 (in a circle) |
| Trigger Condition | Consume Fully Broken Armour |
| Can Break Armour? | No |
The setup requirement is real — you need another skill handling Armour Break before this fires. But once that pipeline is running, Runeforged Blades turns every kill-shot into a nova. Add Pierce and Chain, and suddenly a ranged build has one of the more satisfying clear patterns this league has to offer.
Eternal March — Instant Minion Revival on a 4-Second Clock
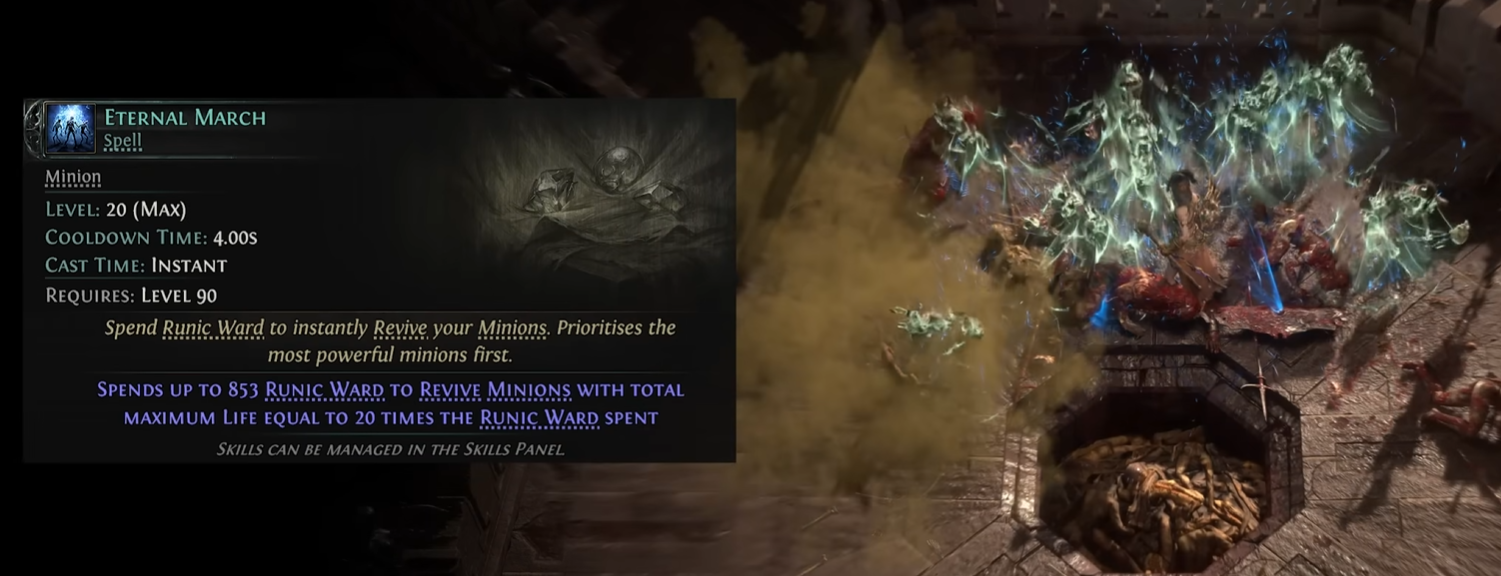
This is the one that keeps your army alive when everything goes sideways. Eternal March is a Level 20 (Max) Minion Spell with an instant cast time and a 4.00s cooldown — and at max level, it spends up to 853 Runic Ward to revive your minions, prioritising the most powerful ones first.
Read that again. Instant. No animation lock. No channeling window where you stand still and die. You press the button, your minions come back, and the fight continues.
The scaling mechanic here is what makes it genuinely interesting: the gem revives minions with total maximum Life equal to 20 times the Runic Ward spent. So at the full 853 Ward ceiling, you're potentially restoring minions with a combined maximum Life pool of 17,060. That's not a resurrection button — that's a full army reset mid-combat.
The Runic Ward Ceiling
The 853 Runic Ward cap matters a lot. Eternal March won't just dump your entire Ward reserve into one cast; it spends up to that amount, which means your actual Ward pool needs to reach that threshold to get the full revival value. Running a Ward-starved build means you're reviving fewer — and weaker — minions per cast.
This is exactly why the guide sections on chest piece Ward values and the Rune system upstream aren't just flavour. They're prerequisites. Eternal March is the payoff skill. Everything feeding your Runic Ward is the setup.
Priority Targeting Is Doing Real Work
The tooltip line "prioritises the most powerful minions first" is easy to gloss over. Don't. If you're running a mixed minion army — say, a powerful summoned boss minion alongside a bunch of smaller fodder — Eternal March will spend its Ward budget bringing back the heavy hitters before touching the chaff. Smart triage. You're not wasting 200 Ward reviving three skeleton archers when your main damage dealer is still dead.
Quick Stats
| Stat | Value |
|---|---|
| Gem Type | Spell — Minion |
| Level | 20 (Max) |
| Cast Time | Instant |
| Cooldown | 4.00s |
| Level Requirement | Level 90 |
| Max Runic Ward Spent | 853 |
| Life Restored Per Ward | 20x Ward spent |
The Level 90 requirement is steep. This isn't a gem you're slotting in Act 3 to see how it feels — Eternal March is endgame infrastructure. But once you're there, a 4-second cooldown on an instant full-army revival is the kind of safety net that makes minion builds viable in content that would otherwise just delete your entire summon roster in one bad pack.
Pair this with a Ward generation strategy that consistently hits that 853 cap and you've got one of the more quietly powerful defensive tools in the Kalguuran gem lineup. Not flashy. Just effective.
Runic Reprieve — The Channelled Panic Button
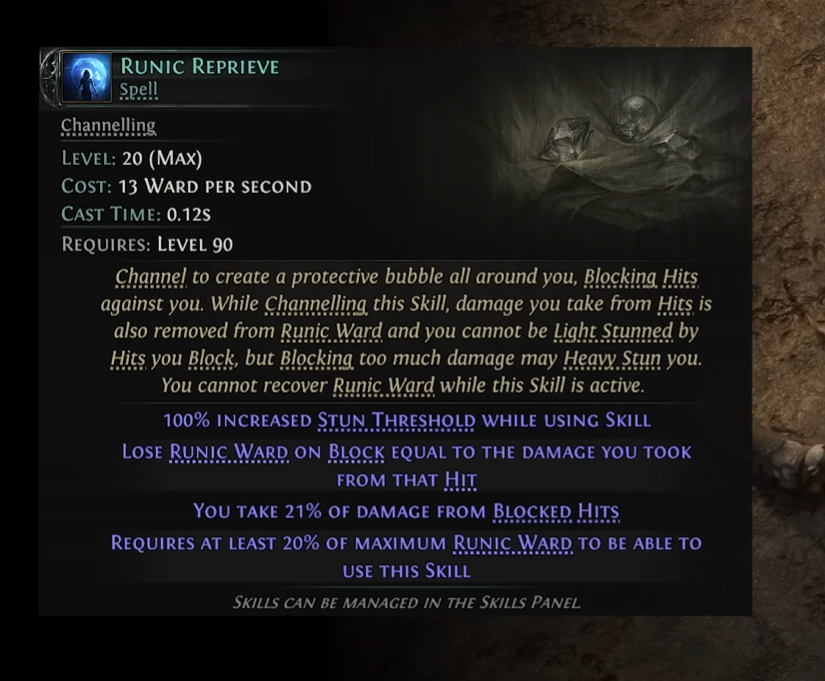
Every Ward build eventually asks the same question: what do you do when the hits come faster than your Ward can recover? Runic Reprieve is the answer. A channelling spell that wraps you in a protective bubble, blocking incoming hits entirely while you hold the channel — and at Level 20 (Max), the numbers behind it are worth understanding before you commit a skill slot.
The cost is 13 Ward per second. Not mana. Ward. That's the Kalguuran identity in one line — your defensive resource is also your fuel, which means every second you channel is a second you're burning the same thing you're trying to protect.
What It Actually Does
Channel to create a protective bubble that blocks hits against you. While channelling, damage you take from hits is also removed from Runic Ward. Blocked hits won't Light Stun you — but block too much damage and you're looking at a Heavy Stun. The bubble doesn't make you invincible. It redirects pressure.
You take 21% of damage from blocked hits. That's the catch. Blocking doesn't mean ignoring — it means filtering. A massive hit still punches through at roughly a fifth of its value, and that residual damage comes out of your Ward pool simultaneously. Stack a few of those in quick succession and your Ward evaporates faster than you'd expect.
There's another hard constraint baked in: Runic Reprieve requires at least 20% of your maximum Runic Ward to activate. You cannot pop this skill on an empty tank. This isn't a last-resort button — it's a mid-fight stabiliser. Use it before you're desperate, not after.
The Key Stats at a Glance
| Stat | Value |
|---|---|
| Skill Type | Channelling Spell |
| Level | 20 (Max) |
| Cost | 13 Ward per second |
| Cast Time | 0.12s |
| Requires | Level 90 |
| Damage from Blocked Hits | 21% |
| Stun Threshold Increase | 100% while using skill |
| Minimum Ward to Activate | 20% of maximum Runic Ward |
The Stun Threshold Line Is Doing More Than It Looks
100% increased Stun Threshold while using this skill. Double your stun threshold. While channelling, you're dramatically harder to interrupt — which matters because a channelled skill that gets stunned mid-cast is just a wasted Ward expenditure. The skill protects its own channel. That's elegant design.
Light Stuns are fully suppressed on blocked hits. Heavy Stuns are not. So the skill punishes you for blocking enormous damage spikes without adequate Ward depth — which is exactly why the guide's earlier section on 120 Runic Ward chest pieces isn't optional flavour. It's load-bearing infrastructure for this skill to function.
The Ward Recovery Lock
Here's the trade-off that doesn't get enough attention: you cannot recover Runic Ward while Runic Reprieve is active. Full stop. Every second you channel is a second your Ward isn't regenerating. You're spending Ward to block hits, taking 21% of those hits as additional Ward loss, and your recovery is frozen the entire time.
This means Runic Reprieve is a burst defensive tool, not a sustained one. Channel through a dangerous window, release, recover Ward, repeat. Players who try to hold the channel indefinitely will find themselves hitting that 20% activation floor faster than expected — and then the skill shuts off entirely, leaving them exposed with almost no Ward remaining.
Used correctly, it's exceptional. Used as a crutch, it's a trap.
Where This Fits in a Kalguuran Build
Runic Reprieve slots naturally into any Ward-heavy Kalguuran build that already invests in maximum Ward as a primary defensive layer. The 13 Ward-per-second drain is negligible if your Ward pool is deep enough — but on a budget character scraping by with 60–80 Ward, this skill will drain you dry in seconds.
The 0.12s cast time means the bubble comes up almost instantly. That's the real selling point. Reactive, fast, reliable — as long as the Ward is there to back it up. Build the Ward first. Then slot Runic Reprieve and let it do its job.
Why These Gems Matter Beyond Their Stats
The no-attribute-requirement rule is the headline. Any class. Any weapon. No tree investment needed to access Cold DoT or Physical Curse explosions.
Kalguuran skills have no gem colors either — they slot freely regardless of socket type. Combined with the Ward cost structure, these gems are designed to reward players who invest in building a Runic Ward pool, not players who min-max a single damage stat. That's a fundamentally different design philosophy than standard PoE 2 skill gems, and it opens up hybrid builds that simply weren't viable before.
So yes — if you're returning for 0.5, learn the Ward system first. These gems are only as good as the resource backing them.
Câu hỏi thường gặp về Path of Exile 2
- Ngày phát hành Path of Exile 2 là khi nào?
- Path of Exile 2 dự kiến phát hành vào ngày 6/12/2024.
- Path of Exile 2 chơi được trên nền tảng nào?
- Path of Exile 2 hỗ trợ: Xbox Series X|S, PC (Microsoft Windows), PlayStation 5, Mac.
- Path of Exile 2 thuộc thể loại gì?
- Path of Exile 2 thuộc thể loại: Role-playing (RPG), Hack and slash/Beat 'em up, Adventure.
- Có trailer chính thức của Path of Exile 2 không?
- Có. Bạn có thể xem trailer của Path of Exile 2 ngay trên trang này ở phần video.
Khám phá thêm
PoE 2 Patch Notes 0.5.2 Summary: Every Change That Matters for Your Build
Path of Exile 2 patch 0.5.2 dropped on June 12, 2026, and it's one of the more player-friendly mid-league updates GGG has put out. Delirium got easier, Runes of Aldur rewards got better, a wave of monsters got their damage tuned down — and there was a brief, chaotic moment where Gemling Legionnaire nearly got quietly gutted before GGG walked it back. Here's everything that actually matters for your build.
PoE 2 Crafts: The Complete Runeforging & Runic Ward Guide for Patch 0.5
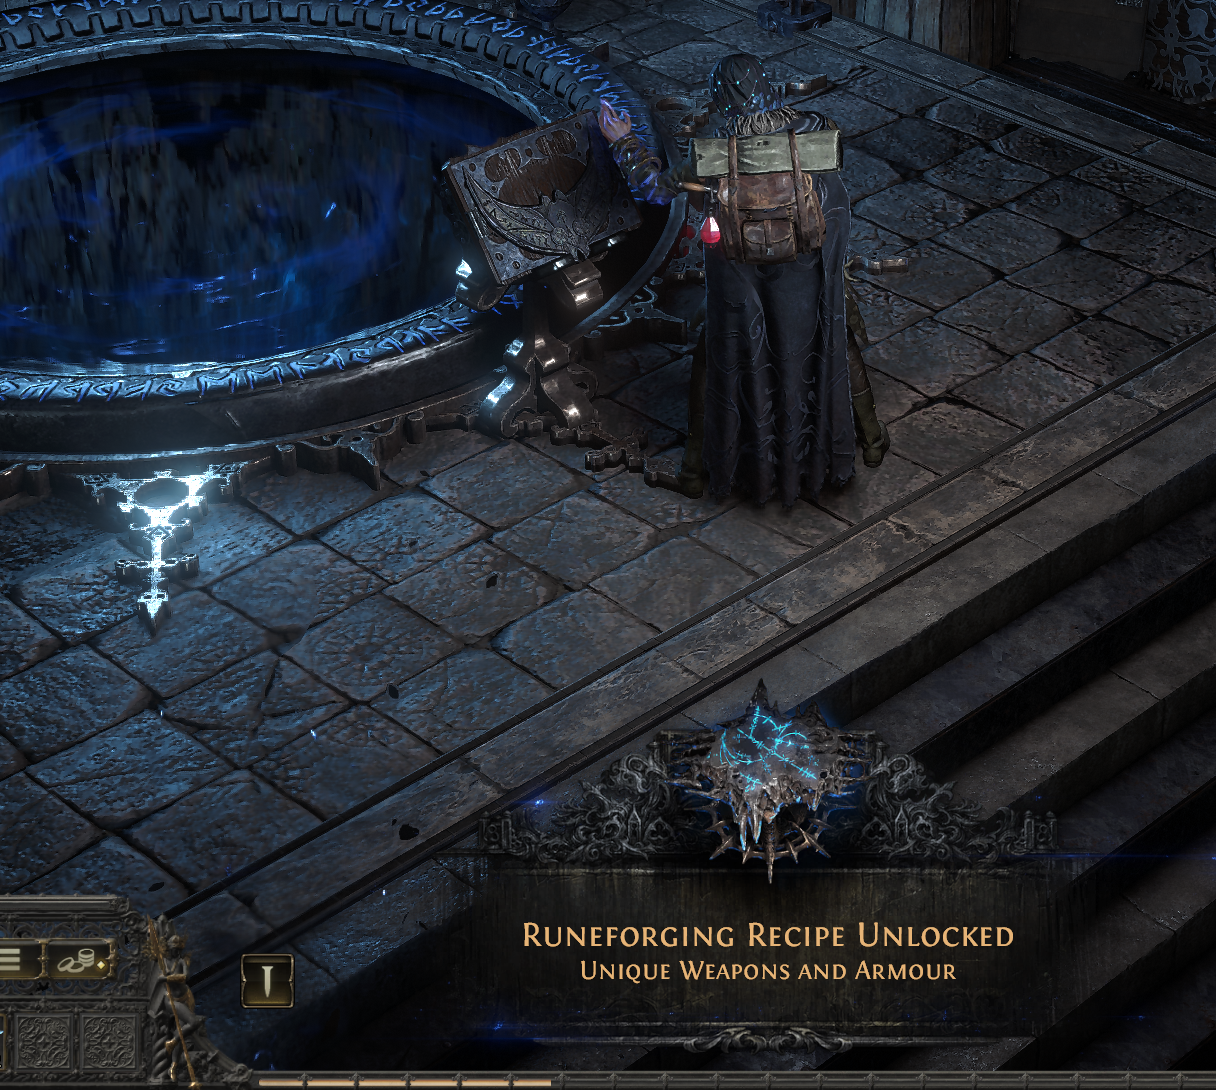
Master PoE crafts in patch 0.5: Complete Runeforging & Runic Ward guide. Learn verisium farming, ezomyte runesmithing, unique upgrades & crafting strategies.
PoE 2 Runic Support Gems: Reddit's Best Builds & Scaling Tips (Patch 0.5)
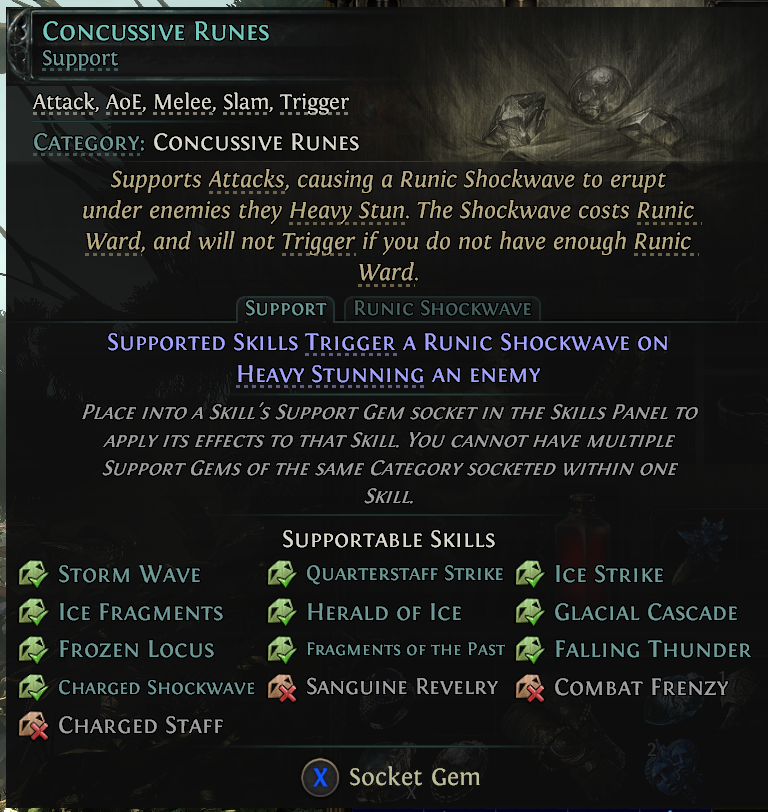
Patch 0.5 introduced Runic Support Gems that let any class use any skill. Discover Reddit's best builds, Runic Infusion scaling strategies, and how to optimize Ward-based damage for endgame.
Path of Exile Reddit: Runic Skills, Builds & Community Troubleshooting Guide
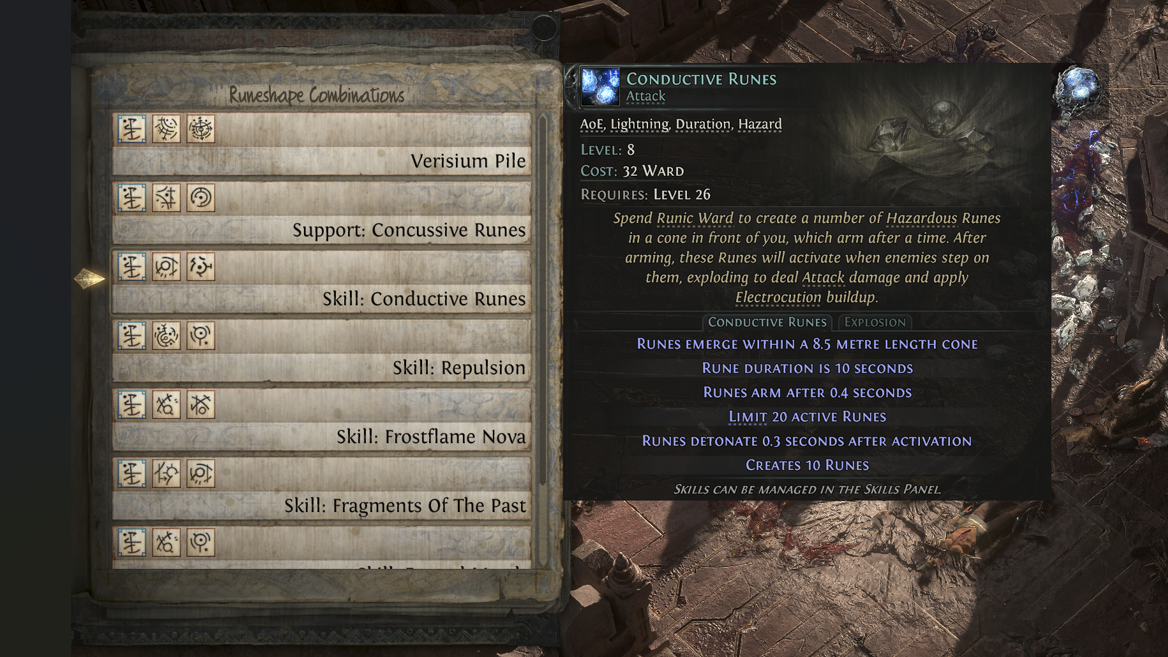
Path of Exile Reddit has dissected the new Runic Skills system since Patch 0.5. This guide pulls together the community's best tips, proven Kalguuran builds, and troubleshooting advice for Ward optimization and Runic skill mechanics.